Showing posts with label recipes. Show all posts

Wednesday, December 13, 2017

St. Lucia and Swedish Cinnamon Star bread

8:40 PM 0 Comments

This morning we celebrated St. Lucia. St. Lucia Day is a Swedish holiday celebrated at Christmastime on December 13th.


St. Lucia was a young Christian girl who secretly brought food to the Christians in Rome who were hiding in the catacombs under the city in order to save themselves from persecution. She wore a crown of candles on her head to light the way and keep her hands free to carry as much as she could. She was sadly killed for her faith in 304 AD.   
Schools and little towns celebrate St. Lucia today in Sweden with a procession with a girl dressed as Lucia, and sing carols. Other children, both boys and girls, dress in white and are part of the procession. 

On December 12th we read Lucia Morning in Sweden and prepare our gingerbread cookies and saffron buns. In the early morning the girls dress up and we surprise Grandma (my 1/2 Swedish mother-in-law) with the cookies and buns. 



This year we decided not to do the saffron buns because my kids don't like them all that much. However, we did research a new Swedish food and ended up making Swedish cinnamon star bread. Swedish star bread is a mid-summer tradition but it looked so good that we gave it a try. And it was! And it was beautiful! We tried THIS recipe and it was a lot easier than I thought. There are a lot of steps but it goes quickly and it's fun. Don't let the lengthiness of the recipe deter you from making it. 


First make the dough and let it rise. Divide the dough into 4 equal pieces and let the dough rest for 15 minutes. After it rests, roll out the dough into 4 thin rounds and topped them with melted butter and sprinkle with sugar and cinnamon. (The recipe says to keep the top layer plain- no butter or sugar/cinnamon. I didn't listen. It also called for egg instead of butter. I like butter.) Stack the 4 rounds on top of each other. Place a 10" plate on top of the dough and cut around the plate to create a nice clean circle.


Place a 2-3" diameter glass, cookie cutter, or lid in the center of the dough. Do not cut through this circle.


Cut the dough in to 4 pieces, then 8 pieces, and then 16. 


This is where it gets fun. Take 2 pieces right next to each other and twist the two outward at the same time, twice. Repeat with the remaining pieces.


Pinch the ends together to create a point.


Cover the dough again and let it rise for about 45 min - 1 hour. When it has risen, brush with egg whites and bake.


 Final product! It is nice and soft.


Dust with powdered sugar or you could even try a little glaze. 


This was perfect. It was delicious! It was a hit with everyone. 

We have been enjoying finding out more about our heritage and adopting some of the traditions of our ancestors.

Monday, December 11, 2017

Christmas Traditions Box: Sugar Cookies

9:02 PM 0 Comments
What's Christmas without cookies and treats? We do a lot of holiday baking. My kids love to decorate sugar cookies. It is a two-day process for us. I make the dough on one day and let it chill overnight. The next day we actually bake and decorate the cookies.


I love this recipe for sugar cookies because they are soft and remind me of the Lofthouse sugar cookies. My kids will eat any frosting but I prefer to use butter over shortening. This recipe originally called for shortening in the frosting but I changed it to butter for personal preference.


This year my daughter is on a gluten-free diet. We made 2 batches- one with gluten-free flour and another with regular all-purpose flour. Both batches turned out great. Our candy selection was scarce (and gluten-free) but we still had fun. Can't go wrong with cookies, right?

Click HERE to download and print our Christmas Sugar Cookie and Frosting recipes.


What cookies do you bake at Christmastime?


Friday, September 8, 2017

The Best Buttermilk Pancakes with Coconut Syrup, Peaches, and Cream

7:33 AM 0 Comments
Some of my favorite recipes contain buttermilk or butter. This is one of those. Never buy prepackaged pancake mix again. This recipe makes the best buttermilk pancakes and the toppings makes them out of this world.


I would love visiting my aunt in the summer when I was a kid because this was the only time I had access to her pancakes. She gave me her recipe years ago when I had my own little kids. As my extended family has grown, I have become THAT aunt to my nieces and nephews and I love it! Whenever we have a family reunion it is a given that I will make pancakes with coconut syrup. In my own home we make them often on Saturdays when the hubs is home and we can all eat breakfast together.


Let's talk about this coconut syrup. This is a recipe from my sister-in-law. It is our absolute favorite. We don't really buy regular syrup anymore either because my kids love the coconut syrup more (which also contains buttermilk AND butter, so you know it's good).

If you eat just the pancakes and syrup, you will LOVE it! However, when it is summer and the peaches are ripe and juicy, they are a MUST topping. They add another dimension to this already delicious dish that will knock your socks off. And, don't forget the whipped cream- either canned or freshly whipped. Put all of these together and you will be in breakfast heaven!


A warm pancake (or two, or three) served with fresh whipped cream, topped with peaches, and drizzled with coconut syrup is all you need. It is DIVINE. I dare you to try it. Go all out while the peaches are in season. You won't regret it. Get the recipe below!

Click HERE for printable recipe.


Wednesday, August 23, 2017

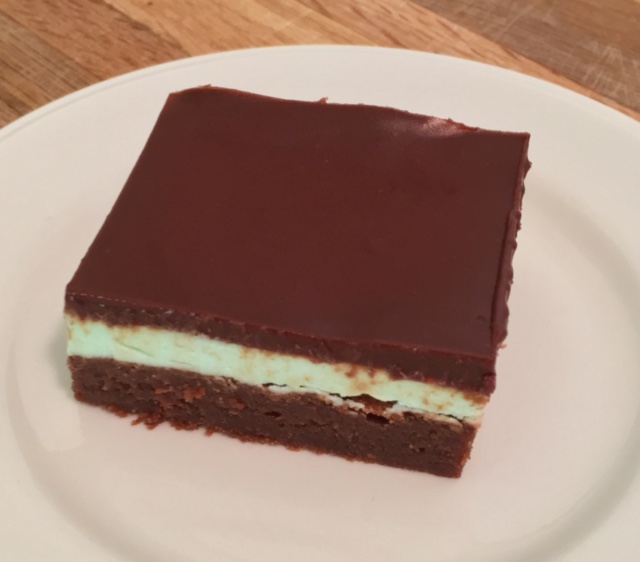
Fudgy Mint Brownies

8:34 AM 0 Comments


I can't help myself when it comes to dessert and these fudgy brownies are one of a kind. They practically melt in your mouth.


You can pour your brownies directly into a greased pan or line it with foil and grease it for easy release. I like to line it so I can lift the whole thing out of the pan in order cut the brownies cleaner. 


Prepare and pour your batter into the pan and bake.


You will know when the brownies are done when the sides pull away from the pan and the whole thing jiggles a little bit. Don't worry about the jiggle. It will firm up when cooled. The top will look slightly browned. Do not overbake. It should NOT be totally firm like a typical cake. The top of the brownie should not be wet. If so, it is underbaked and not ready. 


Let the brownie cool completely and spread on the mint frosting. Chill until frosting is firm and cold.


Prepare the chocolate ganache and spread onto the cold mint frosting. Return the refrigerator (or freezer) until chocolate hardens. 


When the brownie layers are chilled, cut and serve. You can either serve them cold or let them come up to room temperature. Both ways are delicious. 
TIP: Dip your knife into hot water before each cut to obtain a clean look and keep the layers together. 

Click HERE for printable recipe.


Sunday, August 13, 2017

Better Than CHIP Cookies

9:00 PM 2 Comments
If you live in Utah the latest craze is CHIP. CHIP is a chocolate chip cookie take-out and delivery joint started by BYU students. They only serve chocolate chip cookies and it will cost you $10 minimum for a box of 4 huge, warm cookies. Not a bad business plan at all! In fact, they are brilliant! I must say that they are pretty dang good. However, there is one element that is missing from the cookie and I hope they can correct it. In my opinion, there isn't enough salt. I love the balance between sweet and salty and CHIP cookies definitely need more salt. Other than that, I love the thick, warm cookie. If you're in the Provo area, check out CHIP and support their business. 


If you like your cookies with more salt try these cookies! The recipe is an adaption of Jacques Torres' famous chocolate chip cookies. My husband and I have been making these for years but we don't make them very often because the dough has to chill for at least 24 hours and our impatience gets the best of us. But the 24 hours is worth the wait if you can plan ahead. 


Before 24 hours of the dough chilling, use a big scoop (this is a 1/2 cup scoop) or a spoon to dish out the dough. If you don't have a 1/2 cup scoop, form the dough into a ball about the size of a tennis ball. Place on a cookie sheet lined with parchment paper and sprinkle some high quality sea salt on top. It doesn't take much. There is also salt in the dough. YUM! Chill for at least 24 hours to let the flavors marry.


One of the reasons why we only can get about 15 cookies out of one batch is because the dough disappears within the 24 hours of chilling. ;) However, the end result is worth it!


These cookies are massive and delicious! I hope you give them a try. 


Click HERE for printable recipe.


Follow us @justonemomtrying

Instagram

Follow Us