Thursday, December 8, 2011

Christmas Stockings: Sewing How-To

8:59 AM 0 Comments


You don't have to make stockings out of plain felt. You can use regular cotton fabric to create a nice sturdy stocking that has shape. The trick is using Pellon iron-on stabilizer.

Here are easy step-by-step instructions to make a simple Christmas stocking.

You will need:

Stocking pattern
Fabric for your stocking and cuff
iron-on stabilizer (Pellon)
Hot iron
Scissors
Sewing machine
Thread
Pins

*NOTE: This tutorial does not include a stocking lining. You can definitely line your stocking. I chose not to for the sake of easiness and simplicity. The stocking will hold up great without a lining.

1. Cut out your stocking pattern and fabric.

2. Open your stocking and place the WRONG side of the fabric over the SHINY side of your stabilizer- this is the "glue side." (When choosing a stabilizer, pick the thickness you'd like for your stocking. I chose a thinner stabilizer so make it easier to sew and turn my stocking inside out in the end. The exact stabilizer I'm using is Pellon 808 Craft Fuse)


3. Pin your fabric to the stabilizer and cut out the stabilizer.


4. Turn your fabric over so that the non-shiny side of the stabilizer is facing up.


5. With a hot iron, fuse the stabilizer to your fabric using a sweeping motion, starting from the middle and working out. (Don't iron over your pins. You don't want to melt them.)


6. Once most of the middle of your stocking is fused, remove the pins and iron/fuse the rest of the stocking. Make sure that the stabilizer is stuck on there really good. I iron and iron and iron until I'm sure it's stuck.


7. You should have a nice, crisp, thicker piece of fabric.


8. Now we'll work on the cuff. Cut out the cuff piece. If you are embroidering the cuff with a name, now is the time.


9. The cuff will go at the top. You will want to make sure the middle seam of the cuff and the middle seam of the stocking line up. You may have to fold the stocking to get it right. When you sew the cuff, the stocking will be open and not folded.


10. Depending on how wide you want your cuff, hem the top of the cuff and stocking all the way across the open stocking.


11. Sew the hem with a topstitch using a small seam allowance.


12. Do the same thing for bottom of the cuff. Press the seam with an iron and topstitch.

13. The cuff is now finished.


14. Pin the stocking, right sides together.


15. Sew your stocking! Here is what I did with the heal of the stocking where the fabric meets.


16. Turn your handmade stocking inside out and admire your work. Press it once more with an iron to get any wrinkles out. DONE!


Thanks for sewing with me today!


Tuesday, December 6, 2011

Symbols of Christmas Bag

10:05 AM 1 Comments


Do your kids need a little reminder of the true meaning of Christmas? I sewed and embroidered this bag with one of my favorite Dr. Seuss quotes. Inside the bag I included some symbols of Christmas. I'm excited to keep this bag of symbols and bring it out every year to remind us of Christ.


Here are some of the items I included in the bag.


Christmas tree: points to heaven and reminds us that God is eternal
Candy cane: shaped like a shepherd's staff, Jesus is the true shepherd that brings us into the fold. He cares for us and guides us. The red represents his great sacrifice and white represents purity. We are cleansed through his blood. Its shape is also a J for Jesus.
Star: wise men followed the new star
Presents: God's greatest gift to us is eternal life through his son Jesus Christ
Candle: Jesus is the light of the world
Angel: told the shepherds of the birth of Jesus

You might want to make your own bag or box with the little symbols too.


Dating At Home: Personalized Video From Santa

4:36 AM 0 Comments


This week's dating idea comes from the North Pole...and it's FREE!

We have a 3-year old daughter who loves Santa. For our date, we are going to make her a personalized video from Santa. It's extra easy and cute with Portable North Pole. The video is about 3 minutes long. Santa talks to your child and includes the child's name, age, where the child lives, pictures of the child, facts about the child, and what the child wants for Christmas. Santa then asks his elves to grab the child's file and enter it into the "naughty or nice" machine.

Click HERE to see a sample.


If you don't have children, make one for your spouse! Or maybe a friend. You decide whether the child (or adult) has been "naughty" or "nice."

Click HERE to get started.

Thursday, December 1, 2011

Tradition of Christmas Stockings

10:57 AM 0 Comments


This morning we had our normal co-op preschool. Today we talked about the tradition of Christmas stockings.

The tradition of hanging Christmas stockings on Christmas Eve originate from Turkey. The story goes that there were three girls that couldn't get married because they were too poor to have dowries. St. Nicholas, who was the bishop of Myra at the time, threw three bags of gold down their chimney. The bags of gold landed in their stockings that were hanging up to dry by the fire. Now kids hang their stockings up on Christmas Eve in hopes that they will be filled with special toys and gifts.

After we talked about the story, we "sewed" our own stockings (two pieces of construction paper cut out in the shape of a stocking and yarn) and decorated them. We hung them on our Christmas tree. When it was time to go, the kids picked up their stockings which were "magically" filled with chocolate gold coins. We had a great time today!

TIP: To make it easier for kids to lace the yarn through the holes, wrap a piece of masking tape around the tip of the yarn.


I picked up a bag of chocolate coins at Trader Joe's and they are delicious!


Monday, November 28, 2011

Holiday Chocolate Fudge Caramel Sauce

7:53 AM 6 Comments


One of the reasons I love Christmastime is because I get to make A LOT of this chocolate fudge caramel sauce. It makes the perfect gift for family, friends, teachers, co-workers, party hosts, etc. This is my favorite recipe and it is so easy. You can easily double, triple, or quadruple this recipe to fulfill your needs.

Ingredients:

2 cups light corn syrup
1- 14 oz. can sweetened condensed milk
1 cup salted butter
2 cups semi-sweet chocolate chips


Directions:

1. In a medium pot, combine the light corn syrup, sweetened condensed milk, and butter together. Over medium-low heat, stirring constantly, mix ingredients together until butter is completely melted.


2. Add the chocolate chips. Continue stirring about 10 minutes or until chocolate is melted and mixture just begins to boil. Remove from heat.


3. With an electric mixer, beat the hot chocolate for 2 minutes on medium-high speed.


4. Fill clean and sterilized mason jars.


5. Fit lid and ring snuggly. Quickly move jars to a safe location where they won't be jostled. Jar lids will seal within a couple hours. Jars may be moved after they have been sealed.


Drizzle over ice cream, brownies, cheesecake (or just eat it out of the jar with a spoon, like I do).

Refrigerate after opening. Can be stored in refrigerator for up to 3 months.

Enjoy!

Thursday, November 17, 2011

DIY: Gift Bags from Wrapping Paper

8:43 AM 20 Comments


You can make gift bags, treat bags, or lunch bags from any kind of paper. These are especially handy if you're trying to save some cash or have a particular paper design you'd like to use to match a party theme. Here is a step by step guide on how to make your own decorative bag.

It looks a little overwhelming at first but it is really easy. After you do the first one you'll get the hang of it and you'll be able to make bigger bags or smaller bags.

You will need:
  • Scissors
  • Glue or tape (I used invisible gift wrap tape- I'm too impatient to let things dry. Invisible tape works great and looks fine or you can use double sided tape on the inside of the seams for an even cleaner look.)
  • Paper (to make a lunch bag size, cut your paper into a 14"x17" rectangle


TIP: Target sells rolls of wrapping paper in their dollar section every now and then. It already measures 17" in width. You can get a lot of bags out these cheap rolls. (I love Target!)

What you're going to do:

1) Start out with your paper faced down on your table- long sides of the rectangle at the top and bottom, shorter sides on the right and left.


2) Bring the right and left sides together in the middle, overlapping one of the sides slightly (about 1/2"). When your seam is all lined up, press the sides down flat and tape the seam shut.


3) Roll the taped middle seam to the right about 1.5" and press sides down to create a new side seam. Roll the original taped middle seam back to the middle then roll it to the left about 1.5". Now you should have 3 side seams on each side.


4) Push the middle side seams inward and flatten your "bag" down.


5) Now we'll work on the bottom of the bag. Fold the last 2" of the bag upward.


6) From the 2" fold mark, fold the bag up one more inch. (This will be important when you collapse your bag)


7) Unfold the bag and open the bottom to create a rectangle. Push the sides of the rectangle in, as though you were wrapping a gift box without the box. It makes it easier to fold the bottom if you stand the bag upside down with the bottom part up.


(I'm switching over to this white paper because it's a little easier to see how this works.)


8) Line up the seams so you have a crisp base on your bag.


At this point you can collapse your bag down to make it easier to tape (or glue) down.


9) Tape the side with the original middle seam up first.


10) Tape the side with no seam down second.


Open your bag!


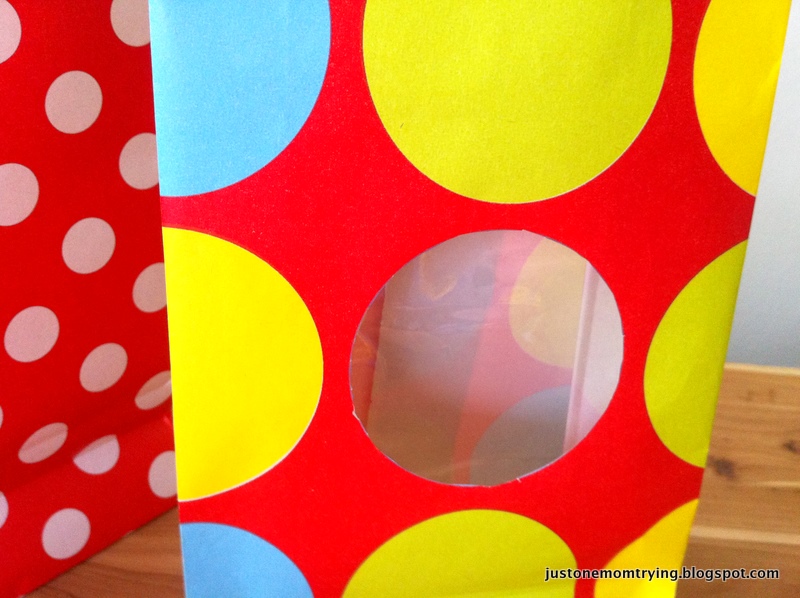
Here's a way you can create "windows" in your treat bags.

I'm using this wrapping paper because it has a circle I can cut out quite easily.


Cut out your window shape and then glue (or tape) cellophane over your window. Proceed to follow steps 1-10 above.


Ta-da!


I love this red and white polka dot paper. Can you imagine how cute it would be for a Minnie Mouse themed birthday party? Or, add a pretty green ribbon for the holidays!

Follow us @justonemomtrying

Instagram

Follow Us