Tuesday, July 12, 2011

Alphabet Stomp Mat

4:37 AM 0 Comments
I was at an educational store a couple weeks ago and saw this cute alphabet game. I thought, "that would be fun for MJ!"
How much did they want me to pay for it? $36.95!! For that piece of plastic? No thank you! So, I made my own version, a sturdy one that won't rip, for about 11 bucks.

Supplies:

One painter's drop cloth ($7.50)
Set of fabric paints ($5.00 with 40% off coupon from JoAnn making it $3.00)
Stencil set (On clearance from $8.99 to 59 cents! at JoAnn Fabrics.)
Paint brush (had a cheap sponge brush at home. You could use a regular clean sponge too.)

1. Cut drop cloth down to the size you want it. (I cut my drop cloth into thirds. I used only one third for this mat. Now I have extra cloth for other ideas that I have. :) TIP: Once you cut your cloth, the cut edges WILL fray and sometimes they fray terribly. To avoid the problem, either hem the cut edge or tape the edge with simple masking tape. If you look closely at mine, you will see my tape. I have plans to sew mine but I just got too excited to paint it.

2. Position all the stencils on the drop cloth and put a small piece of tape on the stencils to hold them in place.

3. Sponge the paint on.


4. Let the paint dry a little before lifting the stencils off. Allow the paint to dry for 24 hours just to ensure that it's completely dry before playing.


I haven't ironed my mat yet but I love it!!!! It's nice and sturdy and MJ can stomp on it and play on it!


We've already played some fun games:
  • MJ stomps from letter to letter to spell her name or other simple words.
  • I will shout out a letter and see if she can stomp on the correct letter for letter recognition.
  • Cover up the letters with old game board pieces.
  • Use a bean bag to toss onto the letters
  • Fun practice for spelling lists for older kids.
  • Grab a set of alphabet flashcards and match the letters on the mat.
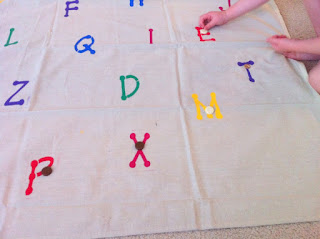

The great part about making things on your own is that you can make it how you want it. You can change the stencil style, or put cute pictures on it, etc. I would love to decorate the edges a bit.

Friday, July 8, 2011

Kid's Caprese Salad (and Easy Mommy Version)

6:19 AM 0 Comments
MJ is 3 years old and doesn't like any kind of green salad. However, she will eat tomatoes and cheese. I've come up with an easy kid's caprese salad that MJ loves. VICTORY! I WIN!


Kid's Caprese Salad

9 Grape Tomatoes, halved or quartered
1 Stick of String Cheese, cut in coin-like pieces
salt and pepper to taste

Toss together.


I made a "mommy" version of this salad by adding some balsamic vinegar, a tiny bit of olive oil, and some fresh basil (if I have it lying around). YUM!


DIY: Instant paper books

5:52 AM 2 Comments
My three-year old is very artistic. She loves to color, paint, cut, draw, etc. She is also very imaginative. We created our own little paper books to illustrate. Here's an easy way to turn a piece of paper into a little book.

I used a large piece of construction paper here. You can use a regular piece of printer paper, or get fancy with some scrapbook paper.


1. Fold the paper into eighths.


2. Fold your paper back in half "hamburger" style. On the folded seam, cut between the two "squares." Cut only one square deep. I used a marker so you can see where to cut.


3. Open your paper up again. You should have a cut in the middle of your paper.


4. Fold your paper in half again, "hot dog" style.


From the top view, it should look like this- folded seams on top.


5. Grab the ends of the paper and push them toward the middle so it looks like this:


6. Fold the pages together so they look like a little book. Tada!


Here's another version with a lot of little pages.

Here's my construction paper again.


1. Fold the paper into 4x4 "squares"


2. Cut 3 squares deep on the top and the bottom rows, cutting in the same direction. On the middle row, cut 3 squares deep going in the OPPOSITE direction. Check out the dashed lines I marked.


Cut


3. Beginning at the top corner, start folding back and forth.


4. When you get to the end of the row, fold DOWN one square and continue folding back and forth with the second row.


5. You should end up with a cute little book that looks like this.


We had a great time illustrating our books and "reading" them to each other.

When I was a high school Spanish teacher, we made these little paper books as study aids for my students. We wrote down all the Spanish verb tenses and their conjugations along with when to use the verbs, blah, blah, blah... Anyway, my point is, that they are good study aids for your older kiddos. :)

Endless possibilities.

Date Night...at Home: Teach Me Poker

4:37 AM 0 Comments
I have no idea how to play a real game of poker. My husband does. He's not a gambler but we love playing card games. Tonight, he's going to teach me how to play poker. We don't have any poker chips but we're going to improvise. Maybe those leftover fruity marshmallows will do. I would prefer the chocolate poker chips but I don't know where to find them without ordering them online. Maybe a party store?

I have a feeling that this chart might help me.


I'm also going to suggest that the person who ends up with the most "money" at the end of the night wins a 15 minute back massage from the "loser." That's way better than chocolate...unless I lose.

Thursday, July 7, 2011

Family Dinners

6:05 AM 0 Comments
This week's ideas for successful family dinners:

DELIGHTFUL DINING:
Centerpieces!

Let your child choose a center piece for family dinner. It can be a flower, candles, or other object. If you'd like, take turns letting each member of the family choose a different centerpiece for each night of the week.


TABLE TOPICS: Get the conversation rolling with one or all of these questions!
  • If you could be any animal, what would you be and why? What noise does your animal make?
  • What is your favorite weather? Why? How does it make you feel?
  • What is the nicest thing someone has done for you? How did it make you feel?

ON THE MENU: What should I make this week? Just some ideas.

Sunday: Crock Pot Roast and Veggies served with a green salad
Monday: Warm Roasted Vegetable Salad with Baked Potato Wedges
Tuesday: Orange chicken served over rice, and stir-fry vegetables
Wednesday: Leftovers
Thursday: Bowtie pasta topped with vegetable cream sauce, served with garlic bread
Friday: BBQ Kabobs and corn on the cob served with fruit salad

**If you'd like any of these easy and yummy recipes, send me a comment. I'd be happy to share!

Wednesday, July 6, 2011

Preschool Manipulatives (And They're Cheap!)

5:21 AM 0 Comments
Does anyone else LOVE Target's dollar bins? I love to find little treasures. On my last trip to Target, I found these 3 packages. Yes, $1.00 each.


First we opened the Bolts and Nuts. We decorated our laundry basket. My next plan is to get some cardboard pieces and put holes in it so we can actually build something. I like how each bolt is a different shape and the nut matches in color and shape.


These are our circus people. They are very good at balancing.


We haven't opened up the lacing beads yet. We've been having too much fun with the other two. Maybe we'll have a chance today.

These are great manipulatives for preschoolers. MJ loved counting and sorting the people too. I bet you could create all sorts of great games with these.

Tuesday, July 5, 2011

Flower Shop

5:17 AM 0 Comments
What did we do with all those paper flowers we made? We "sold," "arranged," and "watered," and "picked" them in our new flower shop. We covered a moving box (for the most part) with wrapping paper, put our flowers in vases, and MJ rang me up at the cash register. We had a great time playing together.

Follow us @justonemomtrying

Instagram

Follow Us