Thursday, November 30, 2017

Save Your Skin this Winter! + GIVEAWAY!

9:28 AM 3 Comments
I didn't have much of a dry-skin problem growing up in California. However, when I moved to Utah it was a whole new ballgame. Utah became the death of my skin. My hands started cracking and bleeding from dryness. I tried lotions and creams and other "dry-skin" products but nothing seemed to give me the relief I needed. I spent lots of money trying to figure out a cure for my poor, itchy, flaky, cracked, bleeding hands.

A friend introduced me to Country Care and my search was over! Country Care is a balm to help heal dry, sore, cracked skin.


Being a mom with babies, I wash my hands constantly every day, especially during cold and flu season. My hands dry out quickly. I also like to wear flip flops in the spring, summer, and fall so my feet get a beating. They dry out and get really tough. I use Country Care to restore my hands and feet all year round. We also use it on my daughter's eczema to relieve her from her soreness and itchiness. I have met many parents who don't know what to do for their child's eczema- expensive creams and prescriptions are ongoing. I have found that this is the best solution for our family. It may be the solution for yours!

Why I LOVE Country Care:

1. Country Care is made from All Natural Ingredients. This means that it is safe for children and babies.

2. Country Care does not contain alcohol or perfumes so it doesn’t burn or sting when it’s applied.

3. Country Care’s thick formula locks in moisture. It soothes and softens rough skin.

4. Country Care won’t cost you a fortune. The price is right and a little goes a long way. You don't need to use a lot to get great results.

It has become one of my “must-have” products to have on hand at all times. I have it in my purse, in my diaper bag, on my nightstand, in my bathroom, and in my car.

I love this product! I think it should be sold in all stores. Right now it is only available online at Country Care Products through Etsy or directly from the owner at countrycareproducts@yahoo.com. Makes a great gift or stocking-stuffer! Just in time for the holidays!

Want to try it for free? I am doing a giveaway! The owner of Country Care products has kindly sponsored the giveaway.

This giveaway is closed! Thanks for all those who entered here and on Instagram.

WE HAVE 2 WINNERS! 


SUSANNA, you are a winner!!!

AND

AIMESRILEY, you are a winner!!! 

I will DM you so you can claim your Country Care!


Monday, September 25, 2017

Is the Costco Rotisserie Chicken a Good Deal?

9:50 PM 4 Comments

I absolutely LOVE Costco's rotisserie chicken! It tastes good, it's already cooked, and is a great price. But is it the BEST price? The short answer is yes, and no. Yes, if you want already cooked chicken with minimal work. And no, if you're willing to prepare and cook an entire raw chicken. 


To the see the long answer, read on.


 A Costco rotisserie chicken is 3 lbs minimum for $4.99 total WITH bones. Let's compare other Costco options. Let's start with the uncooked options:


Organic is probably your healthiest option but most expensive deal at $5.49/lb for raw, boneless, chicken breasts.


If organic isn't a must for you, these raw, boneless chicken breasts are $2.79/lb. Some recipes call for raw chicken, especially marinades, so this is a good option that is easy to manage and prepare.


This 2-pack of whole raw chickens is only $0.99/lb. Remember that it also has bones and you have to cook the entire chicken. But, if you're willing to do the work, THIS is your cheapest option, based solely on price per pound. If you have an InstantPot, you might not mind the work.

As for cooked chicken options, Costco has the hand pulled chicken meat from the rotisserie chicken at $4.568/lb. This is not a great deal unless you want ONLY cooked chicken breast meat. 


What if you pulled your own chicken off your own rotisserie chicken? 
I de-boned 2 rotisserie chickens pretty thoroughly.


I had a bowl full of white and dark meat. I weighed the total meat of each de-boned chicken. Each came out to just over 34 oz. I decided to be safe and say each chicken is about 34 oz of just meat or just about 2.13 lbs. (If you wish to save the bones to make a broth, this is an added advantage to this option.)


But if you remember, the whole raw chicken was $0.99/lb WITH bones. So, if we take the total price of the cooked rotisserie chicken and multiply it by the weight WITH bones, the whole cooked chicken comes out to about $1.66/lb.


Based on PRICE alone, the whole rotisserie chicken is NOT the best deal. BUT, it IS the best deal if you want already cooked chicken and don't want to cook an entire chicken. 


 I prefer the rotisserie chicken because it's still an amazing price and the recipes I use most call for chicken that is already cooked. It saves me so much time with 4 kids and crazy schedules. When I get home from Costco, I de-bone the chicken while it's still warm. It's so easy. I divide the chicken up into freezer bags and freeze it. It defrosts quickly and then I can add it to all sorts of meals. I throw it into fettuccine alfredo, salads, soups, or casseroles.


This is 2 chickens. 4.5 lbs for $10!!! WORTH IT!!


Thursday, September 21, 2017

Easy Apple Crisp

9:15 PM 0 Comments

It's FALL! And, it's APPLE SEASON! What better way to put those apple to use than in this Easy Apple Crisp recipe. Not only is it easy, it's delicious. This recipe is adapted from a recipe at AllRecipes.com.

If you have one of these cool little apple peeler/corer/slicer gadgets, this recipe got even easier for you. This one is from Walmart but you can find them all over online. This will save you a lot of time, especially if you have kids who love to use this peeler. 
Easy Apple Crisp

Ingredients:

6 large apples (peeled, cored, sliced)
1/2 - 3/4 c. water
1 white cake mix
1 c. brown sugar
1 tsp. cinnamon
1/2 c. melted butter
1/2- 1 c. uncooked oats

Directions:
  1. Preheat oven to 350 degrees F and grease 9x13" baking pan.
  2. Place apples in the bottom of pan. Pour *water over apples.
  3. In a medium bowl (or plastic freezer zipper bag) add the cake mix, brown sugar, cinnamon, and oats. Stir (or shake) together. Add melted butter and mix until crumbly.
  4. Top apples with crumble mixture.
  5. Bake for 50-55 minutes or until apples are tender and crumble is golden brown.
  6. Serve with ice cream and/or whipped cream.
*A word about the water in the recipe. If you have super juicy apples, cut the water back to 1/2 c. If your apples are a little more dry, use 3/4 c. water. I find that a whole cup of water is too much and your apple crisp will be a little watery on the bottom. 

Click HERE for a printable recipe.


(not the best picture but you do what you can when you forget to take a picture right before your husband eats it off his paper plate)


Thursday, September 14, 2017

Zucchini Blueberry Muffins

8:13 AM 0 Comments

These are my favorite muffins when I have a plethora of zucchini from my garden. I originally found this recipe on a website that is no longer available. Bummer. Good thing I printed the recipe. 

This recipe calls for 2 1/2 cup all purpose flour and 1/2 cup wheat flour. I changed it to 2 cup all purpose flour and 1 cup wheat flour because I like the crunch it gives the muffin. You can do whatever you fancy.


And, it also contains buttermilk. Any recipe with buttermilk is an automatic draw for me.


It's a pretty easy recipe.


Shred your zucchini with a cheese grater on the course side. You can also use fresh or frozen blueberries. I have used both. Frozen blueberries keep their shape a bit more and are a little juicier, in my opinion.


I use an ice cream scoop for my muffins and cupcakes. I have several sizes. I used a #20 scoop and filled all 24 muffin cups evenly.


You can print the recipe to these muffins HERE.


Friday, September 8, 2017

The Best Buttermilk Pancakes with Coconut Syrup, Peaches, and Cream

7:33 AM 0 Comments
Some of my favorite recipes contain buttermilk or butter. This is one of those. Never buy prepackaged pancake mix again. This recipe makes the best buttermilk pancakes and the toppings makes them out of this world.


I would love visiting my aunt in the summer when I was a kid because this was the only time I had access to her pancakes. She gave me her recipe years ago when I had my own little kids. As my extended family has grown, I have become THAT aunt to my nieces and nephews and I love it! Whenever we have a family reunion it is a given that I will make pancakes with coconut syrup. In my own home we make them often on Saturdays when the hubs is home and we can all eat breakfast together.


Let's talk about this coconut syrup. This is a recipe from my sister-in-law. It is our absolute favorite. We don't really buy regular syrup anymore either because my kids love the coconut syrup more (which also contains buttermilk AND butter, so you know it's good).

If you eat just the pancakes and syrup, you will LOVE it! However, when it is summer and the peaches are ripe and juicy, they are a MUST topping. They add another dimension to this already delicious dish that will knock your socks off. And, don't forget the whipped cream- either canned or freshly whipped. Put all of these together and you will be in breakfast heaven!


A warm pancake (or two, or three) served with fresh whipped cream, topped with peaches, and drizzled with coconut syrup is all you need. It is DIVINE. I dare you to try it. Go all out while the peaches are in season. You won't regret it. Get the recipe below!

Click HERE for printable recipe.


Sunday, August 27, 2017

PIPE CHIMES GIVEAWAY!

2:16 PM 26 Comments

Our friends at Musical Pipes are giving away a complete set of Pipe Chimes! A $54 value!


Thank you to all who entered the giveaway! We have a winner! 

Congrats to Leah H!!


a Rafflecopter giveaway

We also have good news for the rest of you! Musical Pipes is giving you a 20% discount with a $30 minimum purchase this week only, September 4, 2017 - September 8, 2017. You can purchase your own set of pipe chimes at the discounted rate using coupon code: JUSTONEMOMTRYING

Visit their shop HERE and enter the code: JUSTONEMOMTRYING 

Take advantage of this limited discount! I know you will LOVE, LOVE, LOVE Pipe Chimes!


We love Musical Pipes! Be sure to follow them on Pinterest, Facebook and Instagram!

Please follow JustOneMomTrying on Instagram or Facebook for future giveaways and fun!

Wednesday, August 23, 2017

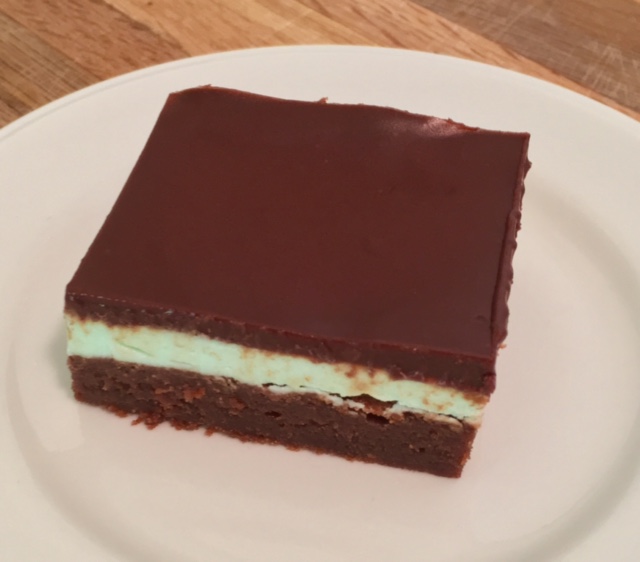
Fudgy Mint Brownies

8:34 AM 0 Comments


I can't help myself when it comes to dessert and these fudgy brownies are one of a kind. They practically melt in your mouth.


You can pour your brownies directly into a greased pan or line it with foil and grease it for easy release. I like to line it so I can lift the whole thing out of the pan in order cut the brownies cleaner. 


Prepare and pour your batter into the pan and bake.


You will know when the brownies are done when the sides pull away from the pan and the whole thing jiggles a little bit. Don't worry about the jiggle. It will firm up when cooled. The top will look slightly browned. Do not overbake. It should NOT be totally firm like a typical cake. The top of the brownie should not be wet. If so, it is underbaked and not ready. 


Let the brownie cool completely and spread on the mint frosting. Chill until frosting is firm and cold.


Prepare the chocolate ganache and spread onto the cold mint frosting. Return the refrigerator (or freezer) until chocolate hardens. 


When the brownie layers are chilled, cut and serve. You can either serve them cold or let them come up to room temperature. Both ways are delicious. 
TIP: Dip your knife into hot water before each cut to obtain a clean look and keep the layers together. 

Click HERE for printable recipe.


Follow us @justonemomtrying

Instagram

Follow Us