Wednesday, December 13, 2017

Christmas Traditions Box: Build a TP Snowman Game + Candy Cane Drop Game

9:14 PM 0 Comments
 I love getting together with friends at Christmastime. This past weekend we visited a family friend. She hosted a delicious dinner followed by games for the kids. One of the games they played was Build a TP Snowman Game. Next year we will add this game to our Christmas box.


Here's how you play:

Build a TP Snowman Game

Materials: one roll of toilet paper per team, paper carrots, paper eyes (just cut out of paper- one set per team)

This is a relay game. Divide your players into two teams. One person from each team is chosen to be "the snowman." Players "build" a snowman by wrapping a teammate in toilet paper. They have to use the entire roll of toilet paper before taping on the carrot nose and eyes. The first team to complete their snowman wins! You can add a hat, buttons, etc.

The kids had a great time. Even the losing team was cracking jokes.


"Here. I'm covering your face so you can't see how badly we're losing." HAHA!

Last week we did include a game for our kids to open in our Christmas Traditions gift box. We included the instructions and materials for the game. It's an easy game to play so everyone can participate, the setup is a cinch, and the materials are cheap. It's my kind of family game.


How to play:

Candy Cane Drop Game:

Tie some ribbon or twine between the backs of two chairs about 3-4 feet apart. Players can either kneel or stand on the chairs as they drop a candy cane (real or fake) and try to get it to stay on the ribbon. The first player to get a candy cane to stay on the ribbon wins. Or you can take turns and whomever gets the most candy canes to stay on the ribbon wins.

Dollar Tree has fake candy cane ornaments that work great for this game. So many candy canes bounced off the ribbon and onto the floor so fake candy canes were ideal. If you use real candy canes, I would suggest playing the game on carpet to minimize broken candy canes.

Our family loved this game. Even grandma joined in on the fun to see if she could beat us out.

Christmas Traditions Box: Indoor Snowball Fight

8:58 PM 0 Comments


When we lived in California we dreamed of a typical white Christmas. But the only white Christmas we got was sand. I didn't complain and we still got some type of "snow" when we made our own snowballs for an indoor snowball fight. They were a "hit" if you know what I mean.

I posted the instructions on how to make these snowballs years ago. I am posting them again for you now.


You will need the following three things to make these:

1) Scissors

2) White or cream-colored nylons- I buy the cheap $1 pair at Walmart. (In the photo are knee-highs that I already had on hand. A full pair works better and you'll get a lot more out of them.) One knee-high can produce up to 5 snowballs. One leg of a full pair of nylons can produce about 10.)


3) Poly-fil to stuff the nylon.


What you're going to do:

1) Grab a handful of the Poly-fil and stuff your stocking (just enough for one snowball). Then make a knot.


2) Make ANOTHER knot after the one you JUST made, leaving a little space between the two knots.


3) Cut between the two knots.


4) Repeat steps 1-3. Below is something you can do but you MUST remember to do step 2 or else you will waste a whole snowball.


Here's what you'll have:


We made hundreds of these last year for a Christmas party we had.


HOW TO PLAY:

If you are going to have a snowball fight, divide the group of people into two teams and divide the snowballs equally between the two teams.

Create boundaries. You can either put some masking tape down on the carpet to divide the room in half, or play on an indoor basketball court, or anywhere that has a boundary line. The teams must stay on their side of the line and cannot cross it.

Set a timer. Let them fight for 5 minutes or however long you'd like the fight to go on. You can have "rounds" of fights if you'd like.

At your signal, the teams will begin to throw snowballs at the other team. When time is up, each team will count the remaining snowballs on their own territory. The team with the LEAST amount of snowballs on their side is deemed the WINNER! (I like this part because they have to clean up the snowballs to see who the winner is.)

This is a great game for preschool, play dates, Christmas parties, birthday parties, office parties, or at home with your own family.

St. Lucia and Swedish Cinnamon Star bread

8:40 PM 0 Comments

This morning we celebrated St. Lucia. St. Lucia Day is a Swedish holiday celebrated at Christmastime on December 13th.


St. Lucia was a young Christian girl who secretly brought food to the Christians in Rome who were hiding in the catacombs under the city in order to save themselves from persecution. She wore a crown of candles on her head to light the way and keep her hands free to carry as much as she could. She was sadly killed for her faith in 304 AD.   
Schools and little towns celebrate St. Lucia today in Sweden with a procession with a girl dressed as Lucia, and sing carols. Other children, both boys and girls, dress in white and are part of the procession. 

On December 12th we read Lucia Morning in Sweden and prepare our gingerbread cookies and saffron buns. In the early morning the girls dress up and we surprise Grandma (my 1/2 Swedish mother-in-law) with the cookies and buns. 


This year we decided not to do the saffron buns because my kids don't like them all that much. However, we did research a new Swedish food and ended up making Swedish cinnamon star bread. Swedish star bread is a mid-summer tradition but it looked so good that we gave it a try. And it was! And it was beautiful! We tried THIS recipe and it was a lot easier than I thought. There are a lot of steps but it goes quickly and it's fun. Don't let the lengthiness of the recipe deter you from making it. 


First make the dough and let it rise. Divide the dough into 4 equal pieces and let the dough rest for 15 minutes. After it rests, roll out the dough into 4 thin rounds and topped them with melted butter and sprinkle with sugar and cinnamon. (The recipe says to keep the top layer plain- no butter or sugar/cinnamon. I didn't listen. It also called for egg instead of butter. I like butter.) Stack the 4 rounds on top of each other. Place a 10" plate on top of the dough and cut around the plate to create a nice clean circle.


Place a 2-3" diameter glass, cookie cutter, or lid in the center of the dough. Do not cut through this circle.


Cut the dough in to 4 pieces, then 8 pieces, and then 16. 


This is where it gets fun. Take 2 pieces right next to each other and twist the two outward at the same time, twice. Repeat with the remaining pieces.


Pinch the ends together to create a point.


Cover the dough again and let it rise for about 45 min - 1 hour. When it has risen, brush with egg whites and bake.


 Final product! It is nice and soft.


Dust with powdered sugar or you could even try a little glaze. 


This was perfect. It was delicious! It was a hit with everyone. 

We have been enjoying finding out more about our heritage and adopting some of the traditions of our ancestors.

Christmas Traditions Box: Gingerbread House + Recipe

7:36 PM 1 Comments
Each year we assemble a gingerbread house. We started with buying the gingerbread house kits at the store. A couple of years ago we wanted a house that reflected our family history. We came across a cute Swedish style gingerbread house template on the Martha Stewart website. So we made the gingerbread from scratch.


Last year's house.


This year's house. (100% decorated by the kids)

Click HERE for an awesome recipe for gingerbread houses and a royal icing for assembling your house.


Now, if you decide to do this, I have an important suggestion. Once you have baked your gingerbread and have cut out your pieces, let your pieces dry out for a week or more. You want those pieces nice and hard to keep them from breaking during assembly.


Icing suggestions:

* To fill your piping bag: place your piping bag or your gallon freezer bag in a tall glass or cup. Open the bag and fold the open edges over the rim of the glass. Spoon your icing into the open bag without the mess.

* When the icing is not being used, place the piping bag in a tall glass with a wet paper towel at the bottom. It will keep your icing tip from hardening.

Candy suggestions:

* Shop your local grocery store, Sprouts, or Winco to find candy in the bulk barrels. You can control how much candy you will need/use for your gingerbread house. There is often a greater selection for candy that you can't find prepackaged.


 Dating at Home: Get creative! Pick out a template online or create your own house. Build your dream house with your spouse. Don't forget the Christmas music. :)

Monday, December 11, 2017

Christmas Traditions Box: Sugar Cookies

9:02 PM 0 Comments
What's Christmas without cookies and treats? We do a lot of holiday baking. My kids love to decorate sugar cookies. It is a two-day process for us. I make the dough on one day and let it chill overnight. The next day we actually bake and decorate the cookies.


I love this recipe for sugar cookies because they are soft and remind me of the Lofthouse sugar cookies. My kids will eat any frosting but I prefer to use butter over shortening. This recipe originally called for shortening in the frosting but I changed it to butter for personal preference.


This year my daughter is on a gluten-free diet. We made 2 batches- one with gluten-free flour and another with regular all-purpose flour. Both batches turned out great. Our candy selection was scarce (and gluten-free) but we still had fun. Can't go wrong with cookies, right?

Click HERE to download and print our Christmas Sugar Cookie and Frosting recipes.


What cookies do you bake at Christmastime?


Christmas Traditions Box: The Legend of Saint Nicholas

8:40 PM 1 Comments
Between my husband and me, we have a lot of European blood running through our veins. One of the things we like to do at Christmastime and other holidays is to research some of the traditions of our ancestors' cultures. We have incorporated Saint Nicholas Day into our Christmas traditions in the past couple of years.

Many European countries celebrate Saint Nicholas on December 6th. For our family, we read Saint Nicholas: The Real Story of the Christmas Legend on December 5th and then on the morning of the 6th our kids are in for a surprise.

Image result for saint nicholas book

In this story St. Nicholas, who was the pastor of a town, found a little boy crying. St. Nicholas asked why he was crying. The boy explained that his sisters couldn't marry because they couldn't afford a dowry. St. Nicholas encouraged the boy to have faith and reassured him that everything would work out.
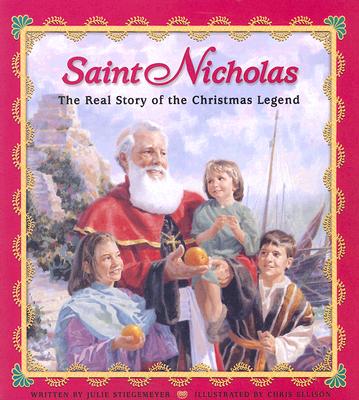
That night St. Nicholas went to the home of the boy, quietly opened the shutter of the window and dropped little bags filled with gold onto the floor. In the morning the girls found the gold and were able to be married.


The story explains how St. Nicholas was known as Father Christmas and how his love was shared with those around him. It also talks about how God is even more generous and gave us the best gift of all- the Savior, Jesus Christ.


Our kids leave their shoes out in front of their bedroom door on the night of the 5th. In the morning their shoes are filled with gold chocolate coins for them to enjoy. There is also a bag filled with "gold" $1 coins. They are instructed to use these coins on someone else outside the family whom they can help or cheer up. They are to do this act in secret without being seen or heard like Saint Nicholas. This helps them to be thoughtful and get outside themselves without being praised by the world.

We talk about how we have received many blessings like the girls in the story. But we can also bless other people's lives like Saint Nicholas did. We also talk about the best gift of all- Jesus Christ- and how we can be more like him. He is our perfect example of love, kindness, and service. It gets us into the Christmas spirit.

Christmas Tradition Box: Chocolate Advent Calendars and Polar Express Night

8:20 PM 0 Comments
I love Christmastime! I love the activities and traditions we do as a family. And the time we spend together to play is my favorite. In the next few blog posts, I will share some of our activities and traditions we do this time of year.

This year I started to present our activities in a gift box. Each day or two in December my kids get to open the box and see what activity we will do that day. It has been fun for them to open their surprise and anticipate some family time.

On December 1st we filled "the box" twice. In the morning the kids opened the box to find chocolate advent calendars to countdown the days until Christmas.

We refilled the box in the afternoon for the kids to open after school to reveal our evening family activity- Polar Express Movie Night.


In the box we included:

Polar Express DVD
Recipe for Creamy Hot Chocolate (found at the end of this post)
Marshmallows, candy canes for hot chocolate mix-ins
Popcorn
Bells (Dollar Tree had some really cute bells this year in silver and gold.)

I didn't print any cute tickets but there are plenty on the internet you can download.

Each year our family opens up Christmas pajamas on Christmas Eve. However, my sister changed this tradition and has her kids open up their pajamas on December 1st so her kids can wear them all through December. I think that we may have to switch up our tradition as well. Next year pajamas may be included in our box.

We loved watching the Polar Express together and loved our hot chocolate. Mmm. Here's a recipe we found and changed up a bit to our liking.

Click HERE to download and print the recipe.


Merry Christmas!

Thursday, November 30, 2017

Save Your Skin this Winter! + GIVEAWAY!

9:28 AM 3 Comments
I didn't have much of a dry-skin problem growing up in California. However, when I moved to Utah it was a whole new ballgame. Utah became the death of my skin. My hands started cracking and bleeding from dryness. I tried lotions and creams and other "dry-skin" products but nothing seemed to give me the relief I needed. I spent lots of money trying to figure out a cure for my poor, itchy, flaky, cracked, bleeding hands.

A friend introduced me to Country Care and my search was over! Country Care is a balm to help heal dry, sore, cracked skin.


Being a mom with babies, I wash my hands constantly every day, especially during cold and flu season. My hands dry out quickly. I also like to wear flip flops in the spring, summer, and fall so my feet get a beating. They dry out and get really tough. I use Country Care to restore my hands and feet all year round. We also use it on my daughter's eczema to relieve her from her soreness and itchiness. I have met many parents who don't know what to do for their child's eczema- expensive creams and prescriptions are ongoing. I have found that this is the best solution for our family. It may be the solution for yours!

Why I LOVE Country Care:

1. Country Care is made from All Natural Ingredients. This means that it is safe for children and babies.

2. Country Care does not contain alcohol or perfumes so it doesn’t burn or sting when it’s applied.

3. Country Care’s thick formula locks in moisture. It soothes and softens rough skin.

4. Country Care won’t cost you a fortune. The price is right and a little goes a long way. You don't need to use a lot to get great results.

It has become one of my “must-have” products to have on hand at all times. I have it in my purse, in my diaper bag, on my nightstand, in my bathroom, and in my car.

I love this product! I think it should be sold in all stores. Right now it is only available online at Country Care Products through Etsy or directly from the owner at countrycareproducts@yahoo.com. Makes a great gift or stocking-stuffer! Just in time for the holidays!

Want to try it for free? I am doing a giveaway! The owner of Country Care products has kindly sponsored the giveaway.

This giveaway is closed! Thanks for all those who entered here and on Instagram.

WE HAVE 2 WINNERS! 


SUSANNA, you are a winner!!!

AND

AIMESRILEY, you are a winner!!! 

I will DM you so you can claim your Country Care!


Monday, September 25, 2017

Is the Costco Rotisserie Chicken a Good Deal?

9:50 PM 4 Comments

I absolutely LOVE Costco's rotisserie chicken! It tastes good, it's already cooked, and is a great price. But is it the BEST price? The short answer is yes, and no. Yes, if you want already cooked chicken with minimal work. And no, if you're willing to prepare and cook an entire raw chicken. 


To the see the long answer, read on.


 A Costco rotisserie chicken is 3 lbs minimum for $4.99 total WITH bones. Let's compare other Costco options. Let's start with the uncooked options:


Organic is probably your healthiest option but most expensive deal at $5.49/lb for raw, boneless, chicken breasts.


If organic isn't a must for you, these raw, boneless chicken breasts are $2.79/lb. Some recipes call for raw chicken, especially marinades, so this is a good option that is easy to manage and prepare.


This 2-pack of whole raw chickens is only $0.99/lb. Remember that it also has bones and you have to cook the entire chicken. But, if you're willing to do the work, THIS is your cheapest option, based solely on price per pound. If you have an InstantPot, you might not mind the work.

As for cooked chicken options, Costco has the hand pulled chicken meat from the rotisserie chicken at $4.568/lb. This is not a great deal unless you want ONLY cooked chicken breast meat. 


What if you pulled your own chicken off your own rotisserie chicken? 
I de-boned 2 rotisserie chickens pretty thoroughly.


I had a bowl full of white and dark meat. I weighed the total meat of each de-boned chicken. Each came out to just over 34 oz. I decided to be safe and say each chicken is about 34 oz of just meat or just about 2.13 lbs. (If you wish to save the bones to make a broth, this is an added advantage to this option.)


But if you remember, the whole raw chicken was $0.99/lb WITH bones. So, if we take the total price of the cooked rotisserie chicken and multiply it by the weight WITH bones, the whole cooked chicken comes out to about $1.66/lb.


Based on PRICE alone, the whole rotisserie chicken is NOT the best deal. BUT, it IS the best deal if you want already cooked chicken and don't want to cook an entire chicken. 


 I prefer the rotisserie chicken because it's still an amazing price and the recipes I use most call for chicken that is already cooked. It saves me so much time with 4 kids and crazy schedules. When I get home from Costco, I de-bone the chicken while it's still warm. It's so easy. I divide the chicken up into freezer bags and freeze it. It defrosts quickly and then I can add it to all sorts of meals. I throw it into fettuccine alfredo, salads, soups, or casseroles.


This is 2 chickens. 4.5 lbs for $10!!! WORTH IT!!


Follow us @justonemomtrying

Instagram

Follow Us